Tuesday, May 22, 2012

A Trip to Never Never Land...or Why Am I Doing This Again?!?!

Ok, this week I learned how hard it is to find certain photos of certain parts of a horse’s body. The full body sculpture I am working on wants to be a boy (Ok, I want it to be a boy! Fine! Are you happy you made me admit it?!?!) so I had to look up...um...er...boy-parts. (There that's a safe wording, right?) Well, don't do that. No seriously don't bother. It'd be better to look for horses falling and hope you have a photo of an upside down horse showing what his mama, I mean, daddy gave him. Well, the best references I could find were.....my resin collection. Seriously?!?!?!?! Sarah Rose and Eberl are the only places I can find a decent shot of the 'stuff' and use it to sculpt by? Yes, that is exactly what I am saying. Although, I admit there was a website that supposedly had 'thousands of photos of animal genitalia' on file as a reference site. Well, my computer wouldn't open the pages and it wanted me to download something so I thought it better not to try my luck with whatever that site was. Coulda been so helpful tho. At least it didn't ask me to register and pay or anything....maybe I'll try it again....on someone else’s computer.... Yeah! That's it. So without further ado.........here is what I created. Otherwise known as my interpretation of a nether region.


Warning Advised: Must be 18 or older to scroll down further!


View from behind.
View from the bottom. (Not to be confused with the movie "View From the Top".)
Here he is after the surgeon finished his Brazilian Butt Lift surgery. No, the cheeks aren't even yet. Yes, he does have a...um...other stuff going on back there. I couldn't just leave him without one right?!?!
And...now for something completely different!
Yes, if you look closely in the left bottom corner you can see the lips of a horse head. No, I don't always take horse heads with me to Olive Garden. Geez, you guys sure are judgmental!
Also, on a real world note, congratulations to I'll Have Another. He was one of my top 3 in the Derby, along with Gemologist and Bodemeister. I decided not to go with him right before the race since he doesn't like sloppy tracks and it had stormed and the Oaks was postponed the day before. I will say that Bodemeister is also a great horse. It's kind of reminiscent of the Affirmed and Alydar races and that match race between Zenyatta and Rachel Alexandra we never got to see.

Monday, April 30, 2012

My dog as a model

So I had this extra bit of clay hanging around and decided to make my dog in Sculpey type clay. Here's my dog. Here she is spying on me from the bed to see what I'm working on and why I am sitting on the floor while she is up on the ginormous bed all by her self. Here she is peeking around her toys and hiding from the camera. Here she is on her side of the bed, well when I'm not there. She manages to sneak over to my side when I'm not at home. I just realized she looks so sweet and nice, but she knows and likes very few people as she is overprotective of me and frightens people constantly. Doesn't help that she has the appearance of a pit bull when not in a good mood. Here is the model that I created in her image. I really need to get a photo of her standing like this for comparison.


Thursday, April 26, 2012

Hell Raiser!

I have had a horse head shape sittin around waitin on me to just add clay and make something out of it. Well, I was having a tree cut down in my back yard yesterday and was jsut sitting around so I decided to take that time to sculpt. Sculpt I did. By the end of the day, my horrid looking semi-zombie horse was finally a live looking horse.

Here is the 'head' that has been sitting around forever, just waiting to be turned into something.
I can see!!!
ZOMBIE HORSE!!!!!!! Coming to a theatre near YOU!!!!
Zombie horses apparently go through the phases backwards and gain flesh.
HURR!!!!! I'm a horse!!!!!!


I have not decided what to do with a neck or mane. I just know I want arched and wild! Ears pinned, not outa meanness necessarily, but just for emotion in the piece. There are also a few tweaks I still wana make to the face as well.


Also, here's the updated photos of the guy from earlier this week.
I also added details to his face.


Fun Tip of The Week!: Take a horse that you actually are liking the results on and bash the heck out of it directly into your metal Ottlite lamp. Make sure it's a sharp edge too, for the most damage to the paintjob. Enjoy!


....FML!!!

Monday, April 23, 2012

Dapple-gänger!

Ah, the road to finding the perfect dappling technique that works with your own skill set. Well, that seems like a logical approach. Do you work better light to dark, dark to light, or tackling them at the same time? Of course, this method of figuring out also has a lot to do with your medium of choice. You can also manipulate your medium to work with your technique. I understand all this, but I'm in a weird league of my own. I understand the different ways and could probably do them quite well. I just get so ahead of myself. I'm OCD and not ADD. I can take my time, but want to hurry towards the end. I can't just put it down. Partly since I'm afraid that I will get busy with other things and forget, but also I really want to find out my formula to dapples. Unfortunately for me, I try to apply all the techniques at once. If one is not working, I abandon it for another and then another and then another. Without sticking to one and not being able to just put the horse down, I work with oils and this just has to be done sometimes, I usually end up distraught and down and out in a way.

Anyway, here is my next dappling technique that came out okay. Not great, but on such a tiny guy I like it for what it is and just need to make the other side match.
Here is what he looked like before dapples.
Yes, I only have dapples on one side so far. I am planning to work on the body a little more. He has horrible brush strokes from the acrylic base coat.
As you can see still no dapples on this side.
I really need to make sure that I have newer photos on my computer before blogging these things. I have his eyes painted in and his hooves are shiny black now.

Saturday, April 21, 2012

Minkiewicz...do I need any other inspiration?

I had a Mink Medallion that I bought that had been base coated in oils. It was intended to be grey. I decided to finally work on it and finish it. I took some paint and shaded it in and in about 15 minutes had a nicely shaded horse. Here he is with paint just applied and no blending applied yet.
After the initial blending took place.
Since that was easy enough I decided to mess with it some more. Though about putting dapples on him, but liked him as is so much that I decided to just leave him be. Here he is while in the 'blind' stage.
After tweaking with him some I finally put an eye on him so he doesn't look like a dead floating fish.
And without flash.
Since these photos, I have gone back and messed with him a little more and redid the eye. Then I tried to use pencils on him and ended up going over it with more paint, which covered the pencil. I also redid the mane and added more dark points to the ends. So far I really like him.

Thursday, March 22, 2012

Birth of an idea

So I got an idea to make a horse. I found this great photo of a stretched out American Saddlebred and thought, "Hey I wanna do that!" So after looking at several ideas I decided to make two. The first though would be inspired by a photo of the horse Winter Sultan. I tend to be weirded out by the giraffe neck that a lot of ASBs seem to have and it is hard for me to wrap my head around. So I found several horses with head at a lower angle yet still parked out.
Step One : Secure horse so that dismemberment is easy. Here I have put the horse in a table top vise clamp and just started sawing. Since he's so small (He was only about 2.5 inches tall before changing his position.) I had to use a small hand saw and not a dremel as I usually would so that there was still material left and I didn't ruin something that would be a pain putting back on.
Step Two : Take all of your pieces and survey the ultimate destruction you have caused to a model horse that did nothing to you. How could you! You have mutilated a horse shaped object. What if you can't make it look half way presentable again? Feel sadness and put away. (Also by the time I was done cutting him up, I had cut him into nine different pieces. I also cut him hind legs apart and his tail off and his face in half. So yeah, I was a little intimidated.)
Step Three : Start gluing back together. I used a soda glue mix here and cut paperclips up to use to hold him together. I have glued the front legs together and the back legs together so that I know that he is standing square. I also heated up the pasterns to get them so they are flat on the ground. I also shaved down the legs a bit since they are really out of proportion and make him a little ponyish. Then I put him against something to act as the body to see how it would look when put together.
Step Four: I attached the body to the front legs with soda glue and paperclip pieces and then filled in the gap with soda glue. Then once again I used something to hold the body to the hind legs to visualize the angle I needed to achieve to attach him. He is a little off in the photo though now that I look at it.
Step Five: Once the hind end is connected I use a paperclip measured to the right length to attach the head and use some painters tape to find the shape of the neck that I want. Then I bumped the head and realized that the neck moved and had to find out where it went again.
Was he looking over his shoulder?
Was he doing an impersonation of a giraffe reaching out for a tree?
Was he looking down?
There he is. He was looking to the side kinda.
Step Six: Now that I know where I want the neck to go, I fill in the neck and shape it with apoxie. I also fill in his tummy with apoxie and somewhere along the line I chopped his face in half and soda glued it together again to lengthen it.
Step Seven: All that is left at this point is to sand and try to carve details and add those little extras that make him go "POW!". Well, maybe not pow. actually I'll be happy if he's horse shaped by the end of all of this.
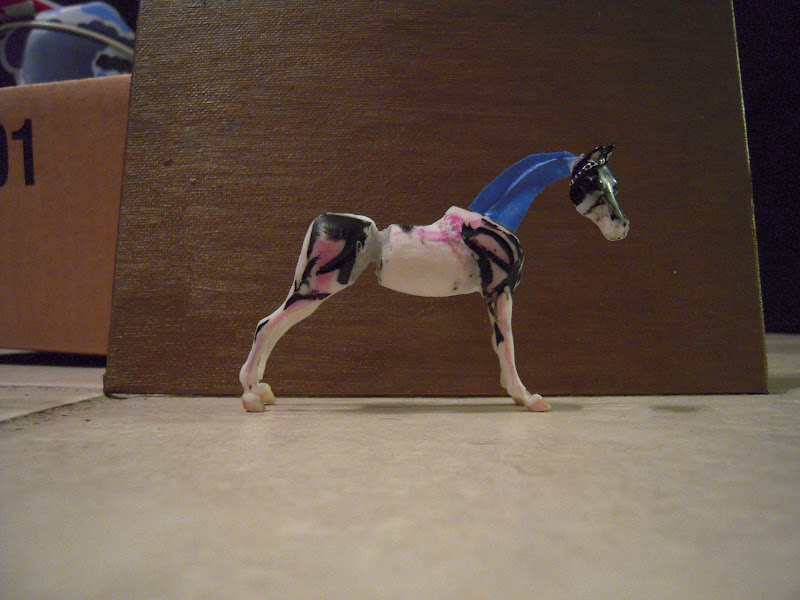
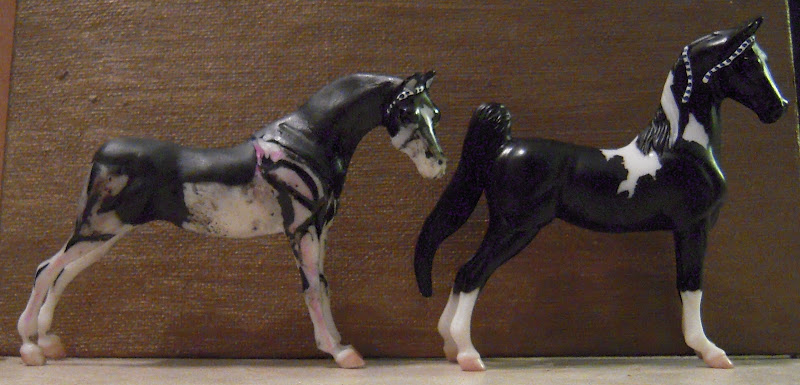
Step Eight: It's also helpful to take a look at what you started with and see how far you have come and that it is still somewhat recognizable as a horse shaped object.

Step Nine:
Here he is all done up in primer. You can see that he is much more smooth than he really looks with the black apoxie on him.

Thursday, March 15, 2012

Experiments wih Salt and Watercolors

So I heard through the grapevine....well....from a friend...that if you use salt with a water soluble paint it will make it do really neat and crazy things. So here's what I created with my experiment. Oh these are Artist Trading Cards so about 2.5 x 3.5 inches.
I'm not sure that I like the splotchy way that this turned out, but it's not entirely sucky, right?
I really like the way that this one turned out a lot more. It's got so many different things going on in it that it really seems interesting, even though it is the same colors as the previous.
Now this one I love. It has a little of everything going on and has it evenly spread throughout the painting/picture and draws your eye. It conforms to my ideal blend of chaos and conformity. It's hard to explain, but this kind of well done chaos appeals to me and really makes me wanna try this technique even more and get it down. Tame the chaos!
Then I decided to make a fish and use the technique to make the scales on the fish. So I showed those close to me and my mom promptly decided to claim it to put on her desk at work.